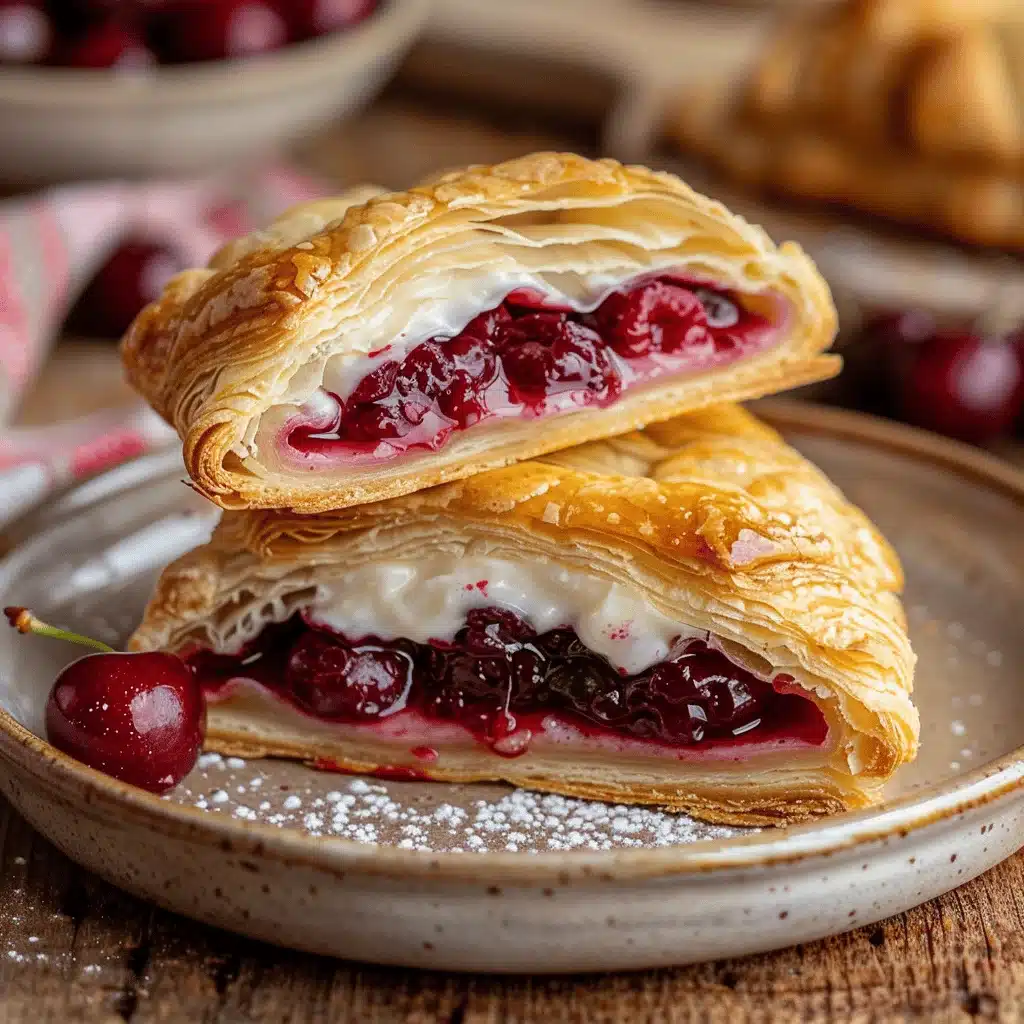
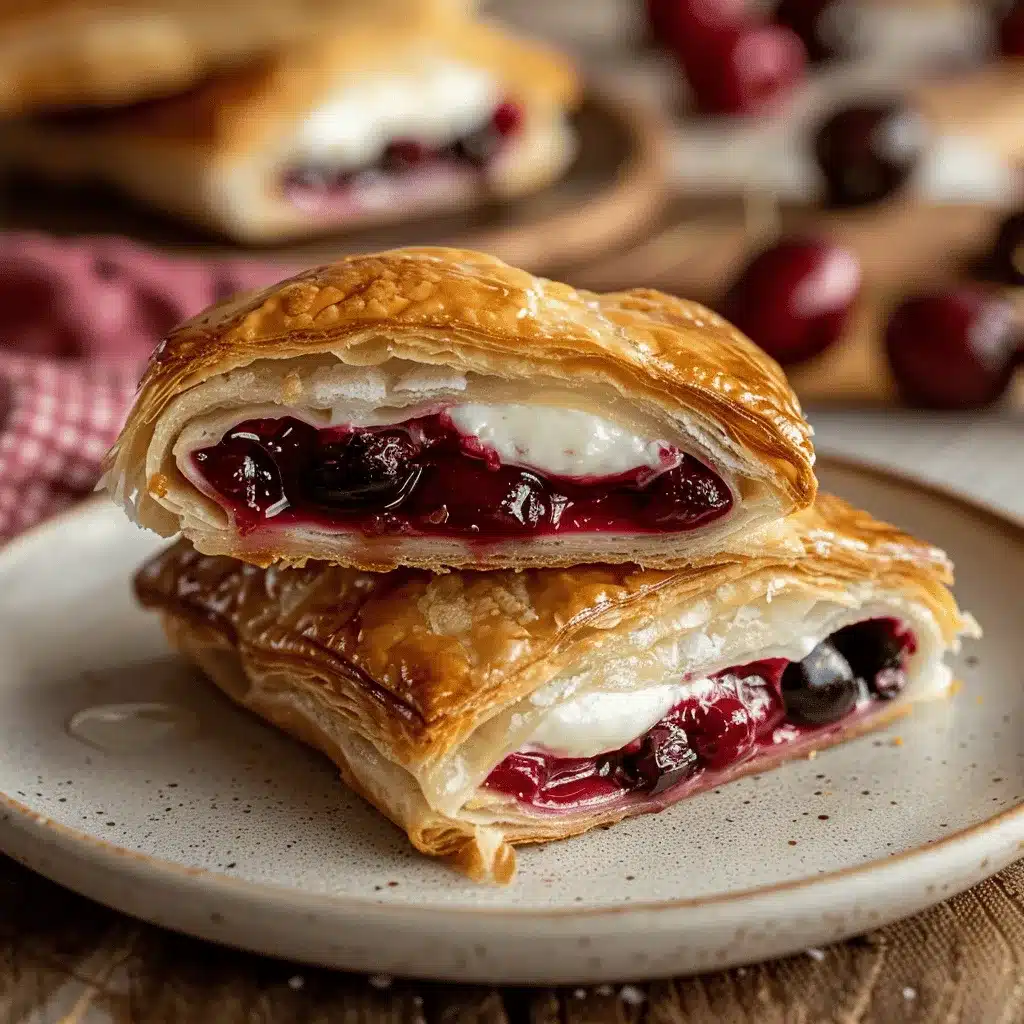
You know that moment when you walk into a bakery and the sweet scent of buttery pastry and warm cherries just hits you right in the nostalgia? That’s exactly what inspired me to whip up this easy cherry cheese danish recipe at home. I remember my grandma bringing home a box of danishes every Sunday—honestly, the cherry cheese ones always disappeared first (not naming names, but I might have been responsible for most of that).
Once I realized how simple it is to make a cherry cheese danish recipe from scratch—using just a handful of ingredients and barely any time—I knew I had to share it. Over the years, I’ve tweaked and tested this recipe so many times, mostly because my family started requesting it for every brunch, birthday, and even random Tuesday mornings.
What’s so special about this version? It’s fast (hello, 30 minutes!), uses frozen puff pastry (no need to mess with homemade dough unless you’re feeling extra ambitious), and the filling is that perfect mix of creamy, tangy, and sweet. Whether you’re juggling a busy morning, planning a cozy brunch, or just want to treat yourself, this cherry cheese danish recipe never lets you down. Plus, it’s a total crowd-pleaser—kids, picky eaters, and even my “I don’t like fruit in pastry” husband all come back for seconds. If you’ve been craving a bakery-style treat but want to skip the line (and the price tag), you’re in the right place!
Why You’ll Love This Cherry Cheese Danish Recipe
I’ve probably made this cherry cheese danish recipe more times than I care to admit, and every single time it gets rave reviews—there’s just something about that flaky pastry and creamy filling. Here’s why I think you’ll fall in love with it too:
- Quick & Easy: You can have fresh, homemade danish pastries on the table in just about 30 minutes. No need to get up at dawn or fuss with complicated doughs!
- Simple Ingredients: Everything here is easy to find. In fact, you might already have most of it hanging out in your fridge or pantry.
- Perfect for Any Occasion: Brunch with friends, lazy weekends, holiday breakfasts, or even a last-minute dessert for unexpected guests—this cherry cheese danish recipe fits the bill.
- Crowd-Pleaser: Honestly, I’ve yet to meet someone who doesn’t ask for seconds. Kids love it. Grown-ups love it. Even that “I don’t do sweets” uncle can’t resist.
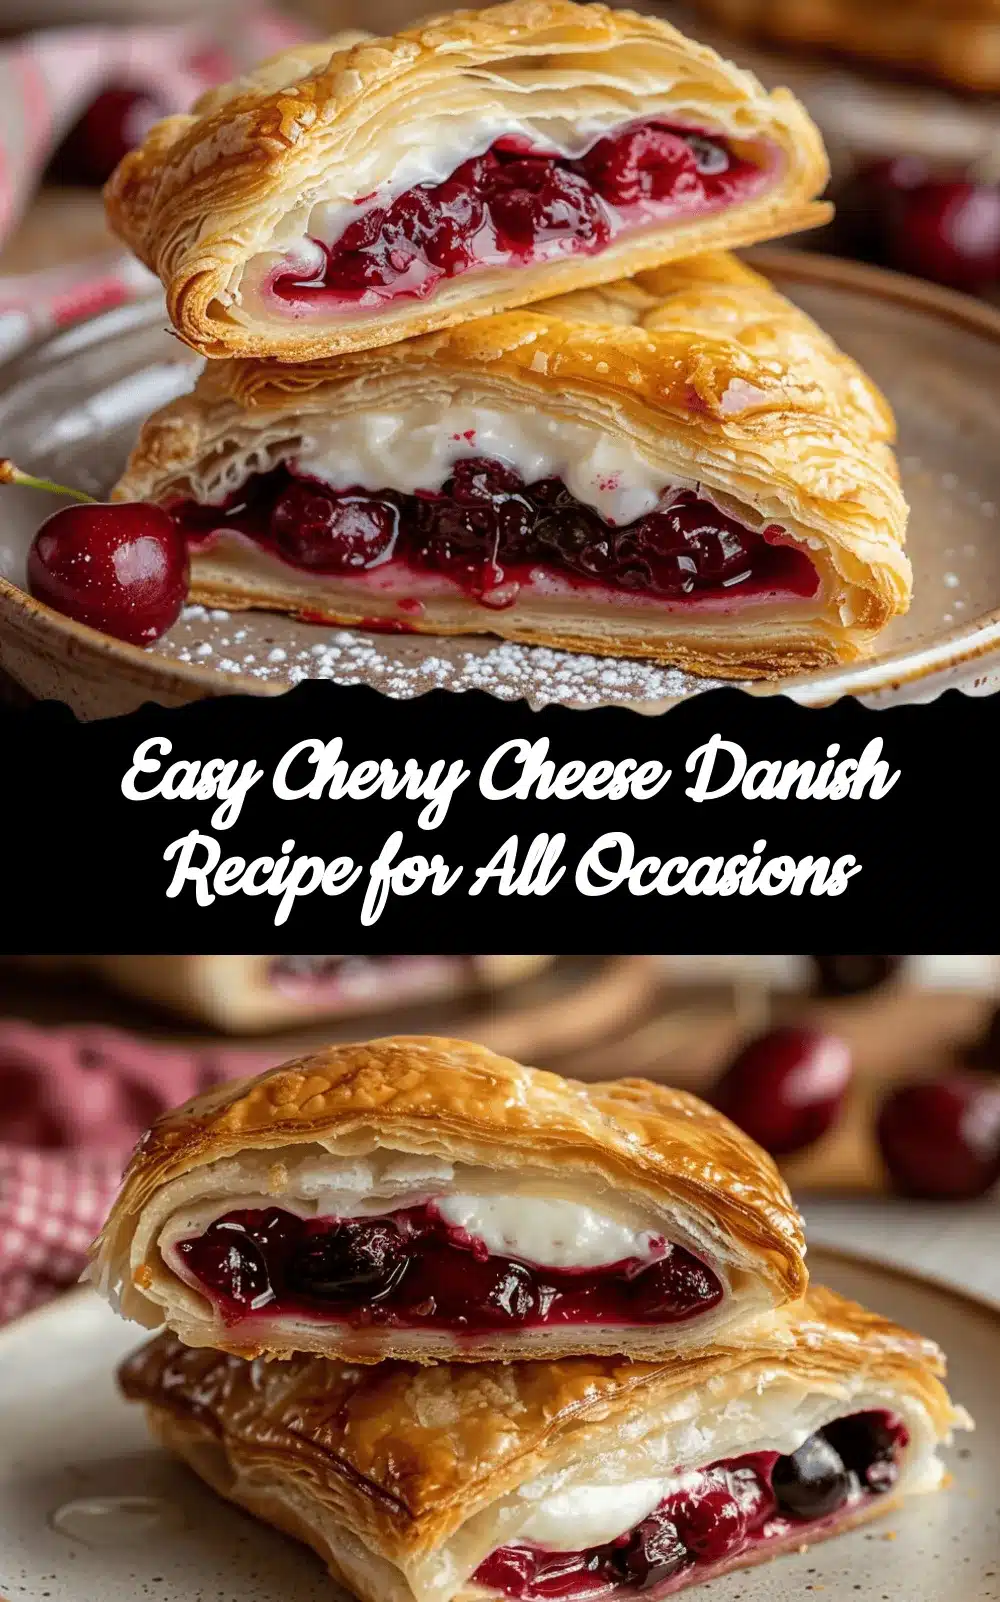
- Unbelievably Delicious: The combo of flaky, golden pastry, creamy cheese, and juicy sweet cherries is just… there’s no other way to say it—it’s pure comfort food, but lighter and brighter than store-bought versions.
What makes this cherry cheese danish recipe different? For starters, blending the cream cheese filling until silky-smooth means every bite is creamy and never dry. I swirl my cherry topping so you get a bit of fruit in every forkful. Plus, because we use puff pastry, you get bakery-worthy layers with zero stress. After making these for so many occasions (including once for a sleep-deprived friend with a new baby), I can tell you—the smiles are real, and the leftovers never last long.
If you love a recipe that’s as easy as it is impressive, this is it. It’s the kind of pastry that turns an ordinary breakfast into a special memory. And you don’t have to be a pastry chef—if you can stir and spread, you’re golden!
Ingredients Needed for Cherry Cheese Danish Recipe
This cherry cheese danish recipe keeps things simple—no weird ingredients, no extra trips to a specialty store, and plenty of room for swaps if you need them. Here’s what you’ll need:
- Puff Pastry Sheet (1 sheet, about 8 oz/225g): Thawed but still cold. I usually grab Pepperidge Farm or Wewalka. You can use homemade if you’re feeling like a kitchen rock star, but store-bought works wonders.
- Cream Cheese (4 oz/115g): Softened. Go for full-fat for the creamiest filling, but regular or light both work. Philly is my go-to, but store brand is fine, too.
- Granulated Sugar (3 tbsp/36g): Sweetens the cheese filling just enough (not too sugary, promise).
- Vanilla Extract (1 tsp): Adds a cozy, bakery-style flavor. Real vanilla is best, but you can use imitation in a pinch.
- Lemon Zest (1/2 tsp, optional): For a little zing. It brightens up the filling, but you can skip it if you’re not a citrus fan.
- Cherry Pie Filling (1/2 cup/160g): Store-bought keeps this easy, but if you want to use homemade cherry compote, go for it! I sometimes stir in a pinch of almond extract for extra flavor.
- Egg (1, beaten): Used for brushing the pastry edges to get that gorgeous golden crust.
- Milk (1 tbsp/15ml): Mixed with the egg for the egg wash—it helps everything brown up nicely.
- Powdered Sugar (for dusting, optional): Just a little sprinkle at the end makes these look bakery-fancy. Totally optional, but fun.
Ingredient Tips & Substitutions:
- No puff pastry? Crescent roll dough works in a pinch (just pinch the seams together before cutting!), or try gluten-free puff pastry if you need.
- You can swap cherry pie filling for blueberry, raspberry, or even apple if cherries aren’t your thing or aren’t in season.
- Lactose-free cream cheese works fine for dairy-sensitive folks. I’ve even used vegan cream cheese in a pinch and it’s still delicious.
- If you like things less sweet, reduce the sugar in the filling by a tablespoon—it won’t hurt the recipe at all.
You really don’t have to overthink it. The beauty of this cherry cheese danish recipe is how forgiving it is—use what you have, and it’ll still turn out amazing.
Equipment Needed
Making this cherry cheese danish recipe doesn’t require any fancy gadgets—just some basics (and a couple of helpful tips from a fellow home baker).
- Baking Sheet: A standard rimmed baking sheet works best. Line it with parchment for easy cleanup.
- Parchment Paper: Keeps the pastry from sticking and makes cleanup a breeze. If you’re out, a silicone baking mat is a great substitute.
- Mixing Bowl: For whipping up the cream cheese filling. I use a medium bowl so I don’t splatter everywhere (been there, done that).
- Hand Mixer or Sturdy Whisk: A hand mixer makes the filling super smooth, but a strong whisk and some elbow grease work too.
- Small Spatula or Spoon: For spreading the filling neatly onto the pastry rectangles.
- Pizza Cutter or Sharp Knife: To slice the puff pastry into even rectangles. A bench scraper works too if you have one.
- Pastry Brush: For brushing on the egg wash. I used to use the back of a spoon before I bought a brush—works in a pinch!
- Microplane (optional): For zesting lemon, if you’re using it.
If you’re working with a tight kitchen budget, skip the fancy gadgets. I’ve made plenty of these with just a butter knife, a bowl, and a fork. Just keep your tools clean and your parchment handy—it really saves time on cleanup.
Preparation Method
- Preheat and Prep: Preheat your oven to 400°F (200°C). Line a baking sheet with parchment paper. This keeps the danishes from sticking and makes cleanup so much easier (trust me, I’ve tried to scrape caramelized sugar off a bare pan—not fun!).
- Roll Out the Puff Pastry: Unfold 1 sheet of thawed puff pastry on a lightly floured surface. If it’s sticking together, give it a gentle roll with a rolling pin to smooth out the folds. Puff pastry should be cold but pliable—if it gets too soft, pop it back in the fridge for 5 minutes.
- Cut Into Rectangles: Using a sharp knife or pizza cutter, slice the pastry into 8 even rectangles, about 3×4 inches (7.5x10cm) each. If you want smaller bite-size danishes, cut into 12 squares.
- Score the Borders: Place rectangles on the prepared baking sheet, spacing them out. Use a paring knife to lightly score a 1/2-inch (1.25cm) border inside each rectangle—don’t cut all the way through. This helps the edges puff up and keeps the filling in place.
- Make the Cheese Filling: In a medium bowl, beat 4 oz (115g) softened cream cheese with 3 tbsp (36g) sugar, 1 tsp vanilla, and 1/2 tsp lemon zest (if using) until it’s smooth and creamy. If you see lumps, keep mixing! A hand mixer makes this quick, but a whisk works.
- Add the Filling: Spoon about 1 tablespoon of the cheese mixture into the center of each pastry rectangle, staying inside the scored border. Spread it gently with the back of the spoon or a spatula.
- Top with Cherries: Dollop about 1 tablespoon of cherry pie filling over the cheese. If your cherries are big, chop them up a bit first. Try not to go overboard or the filling will spill out as it bakes (learned this the messy way!).
- Egg Wash: In a small bowl, beat 1 egg with 1 tbsp (15ml) milk. Brush the edges of each pastry with egg wash—this is what makes them golden and glossy.
- Bake: Bake in the preheated oven for 18-20 minutes, or until the pastry is puffed and deep golden brown. Rotate the pan halfway through if your oven bakes unevenly.
- Cool and Finish: Let danishes cool for 10 minutes on the pan (they’ll be hot!). Dust with powdered sugar if you like, or drizzle with a quick glaze (powdered sugar + milk).
Pin This Recipe!

Cherry Cheese Danish Recipe Easy Homemade Brunch Pastry in 30 Minutes
- Total Time: 30 minutes
- Yield: 8 servings 1x
Description
A quick and easy homemade cherry cheese danish recipe with flaky puff pastry, creamy cheese filling, and sweet cherry topping. Perfect for brunch or dessert.
Ingredients
- 1 sheet frozen puff pastry, thawed (about 8 oz)
- 4 oz cream cheese, softened
- 3 tbsp granulated sugar
- 1 tsp vanilla extract
- 1/2 tsp fresh lemon zest (optional)
- 1/2 cup cherry pie filling
- 1 egg, beaten (for egg wash)
- 1 tbsp milk (for egg wash)
- Powdered sugar, for dusting (optional)
Instructions
- Preheat oven to 400°F (200°C). Line a baking sheet with parchment paper.
- Roll out thawed puff pastry on a lightly floured surface to smooth creases.
- Cut pastry into 8 rectangles (about 3×4 inches each) using a sharp knife or pizza cutter.
- Arrange rectangles on prepared baking sheet, spacing them out.
- Use a paring knife to lightly score a 1/2-inch border inside each rectangle (don’t cut through).
- Beat cream cheese, sugar, vanilla, and lemon zest together until smooth.
- Spoon about 1 tablespoon of cheese mixture into the center of each pastry, staying inside the scored border.
- Top cheese mixture with about 1 tablespoon of cherry pie filling.
- Brush pastry edges with egg wash (egg beaten with milk) for golden color.
- Bake for 18-20 minutes until pastry is puffed and golden brown.
- Let cool slightly, dust with powdered sugar if desired, and serve.
Notes
For best results, keep puff pastry cold until ready to use. You can substitute other pie fillings like blueberry or apple. Crescent roll dough can be used in place of puff pastry. For a less sweet danish, reduce the sugar in the filling. Vegan or lactose-free cream cheese can be substituted.
- Prep Time: 10 minutes
- Cook Time: 20 minutes
- Category: Brunch, Dessert
- Cuisine: American
Nutrition
- Serving Size: 1 danish
- Calories: 210
- Sugar: 7
- Sodium: 180
- Fat: 13
- Saturated Fat: 6
- Carbohydrates: 22
- Fiber: 1
- Protein: 3
Keywords: cherry cheese danish recipe, easy danish, brunch pastry, homemade cherry danish