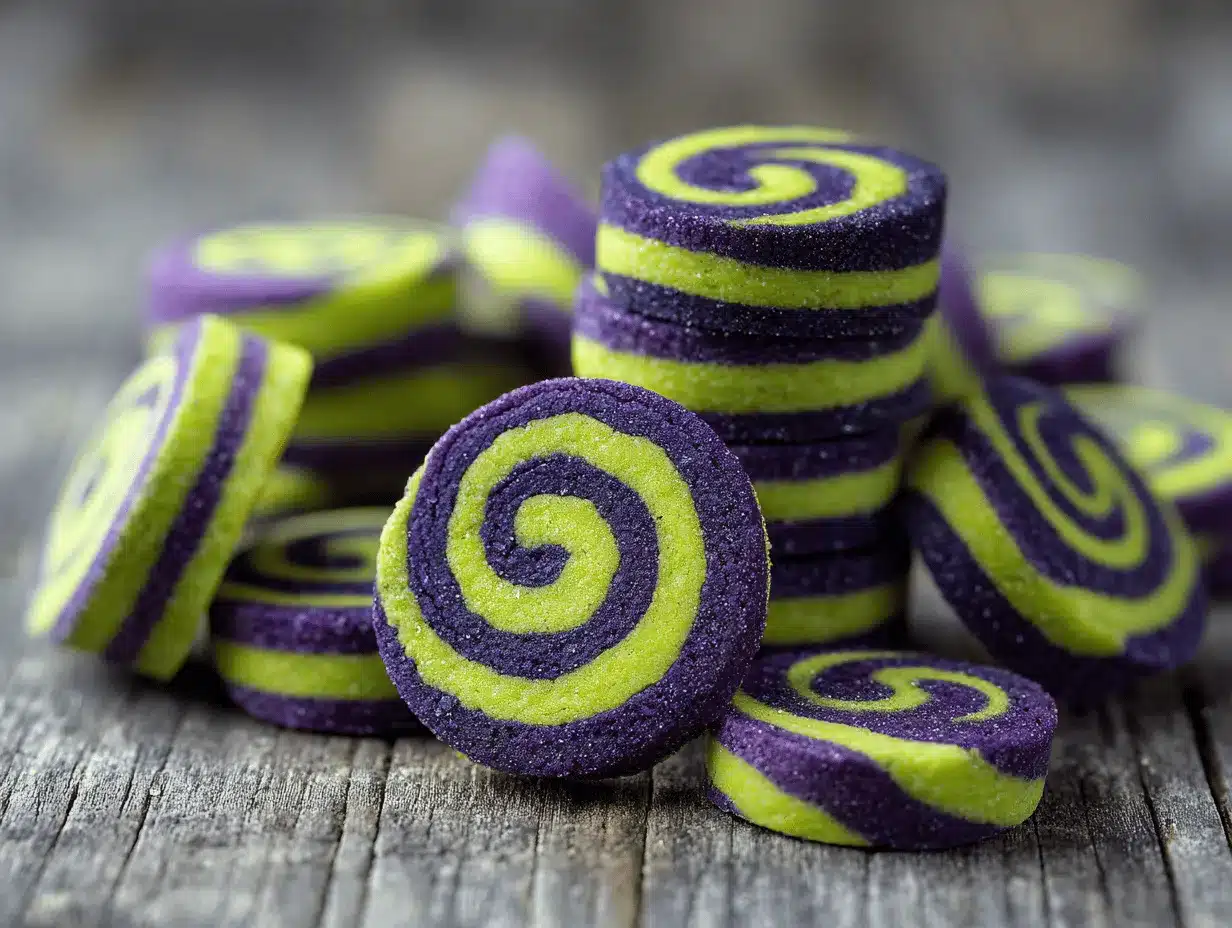
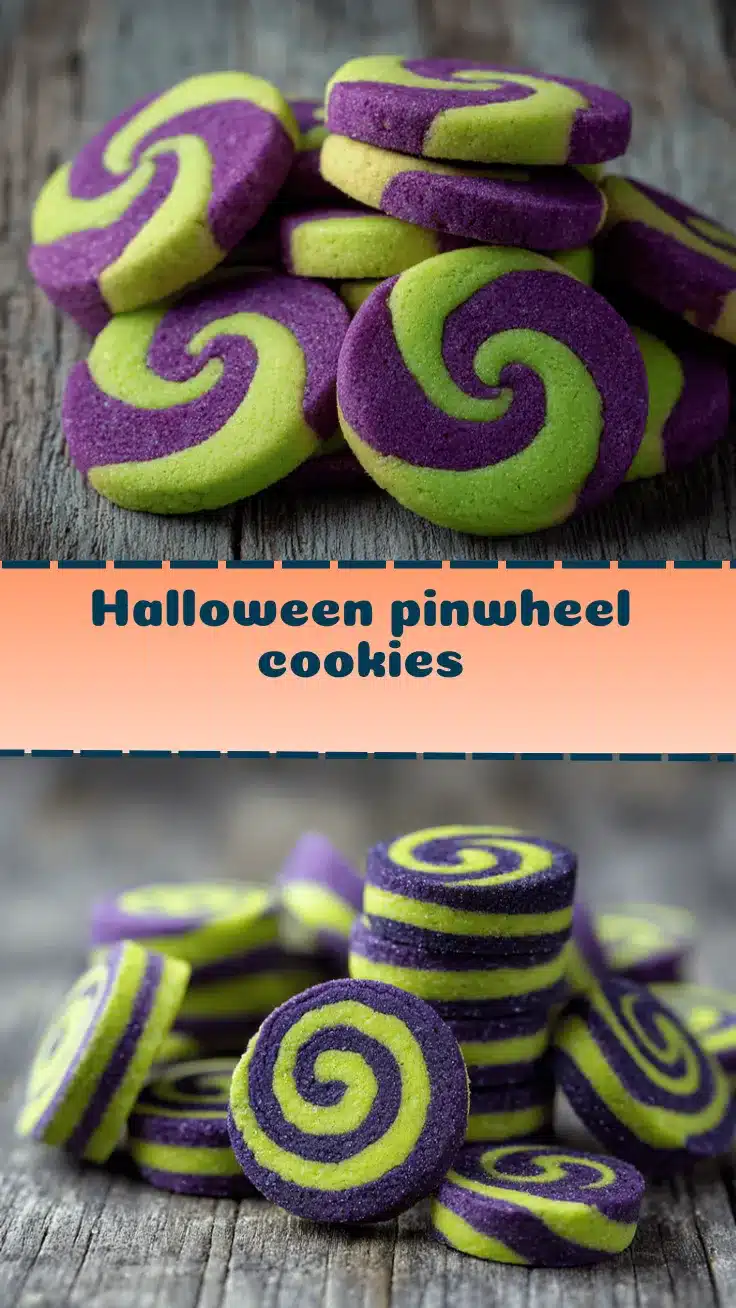
The first time I pulled a tray of vibrant Halloween pinwheel cookies out of the oven, my kitchen looked like a haunted candy factory—swirls of orange and black, a dusting of sugar, and that unmistakable buttery aroma. It’s the kind of recipe that gets kids crowding around the counter, wide-eyed and impatient. I’ll be honest, these cookies aren’t just for the little monsters in your life. Adults sneak them off the platter at parties too! There’s something about the hypnotic swirl—half treat, half magic trick—that makes these Halloween pinwheel cookies the star of any spooky gathering.
My obsession with pinwheel cookies started years ago, but adding a Halloween twist was the game-changer. I wanted cookies that screamed fun but weren’t a headache to make. After lots of testing (and a few colorful disasters), I landed on a method that’s surprisingly simple. You can whip up a batch with minimal fuss, and the results are always Instagram-worthy. If you’re hunting for a treat that’s equal parts festive and foolproof, Halloween pinwheel cookies are it.
Let’s face it, when October rolls around, we want snacks that look adorable but don’t eat up our whole weekend. These cookies pack in all the nostalgia of classic sugar dough, a pop of seasonal color, and a chewy-soft texture that I honestly crave year-round. Whether you’re planning a school party, a neighborhood bash, or just need something to munch during a scary movie marathon, this recipe will fit right in. As someone who’s baked dozens of batches (and fielded endless requests for more), I can say with total confidence: Halloween pinwheel cookies are the treat your spooky party needs.
Why You’ll Love This Recipe
- Quick and Easy: You can prep and bake these Halloween pinwheel cookies in under two hours, which is a lifesaver when you’re juggling costumes and decorations.
- Simple Ingredients: No wild specialty items—just flour, sugar, butter, and a couple of pantry staples. Plus, you probably have food coloring tucked away from last year’s Easter eggs.
- Perfect for Parties: These cookies are designed to stand out on a buffet table. They’re sturdy enough for little hands and look awesome in cellophane treat bags.
- Crowd-Pleaser: I’ve never had leftovers. Kids love the bold colors, and grown-ups appreciate the buttery, soft texture. Everyone asks for seconds (or thirds!).
- Unbelievably Delicious: The dough is rich, soft, and slightly chewy. There’s just the right amount of sweetness—no cloying sugar rush, just pure comfort food flavor.
What really sets these Halloween pinwheel cookies apart is the swirl technique. By layering colored doughs and rolling them together, you get a mesmerizing spiral effect every time. I’ve tested a few approaches—chilling, rolling, slicing—and found that a quick freeze before slicing gives the sharpest lines and prettiest swirls.
Trust me, these cookies aren’t just a Pinterest dream. They’re practical too! The recipe is forgiving, so you can swap colors or add sprinkles to suit your party theme. It’s comfort food with a creative twist—the kind of recipe that makes guests say, “Wait, you made those?!” This is the treat you’ll want to make again and again, whether it’s for Halloween or just because you love the pinwheel look. My family now expects them every October, and there’s a good chance yours will too!
Ingredients Needed
This recipe uses straightforward ingredients to deliver those bold, spooky visuals and a classic sugar cookie flavor. Most items are pantry staples, and you can easily swap for dietary needs or personal taste.
- All-purpose flour (2 1/2 cups / 310g) – Gives the cookies structure and classic texture.
- Unsalted butter (1 cup / 226g, softened) – Adds richness and helps the dough stay tender. (I use Kerrygold for best flavor!)
- Granulated sugar (1 cup / 200g) – Sweetens the cookies and helps with their crisp edges.
- Large egg (1, room temperature) – Binds the dough together.
- Pure vanilla extract (2 tsp / 10ml) – Adds warmth and depth. (Go for real vanilla if you can—it makes a difference.)
- Baking powder (1 tsp / 4g) – Helps the cookies puff up just a bit.
- Fine sea salt (1/2 tsp / 2g) – Balances sweetness and brings out flavor.
- Food coloring – Orange gel and black gel (or purple for a twist). Gel colors work best for vivid swirls without changing dough texture.
- Optional: Halloween sprinkles or sanding sugar for edges.
Ingredient Tips:
- If you want a gluten-free cookie, swap in a 1:1 gluten-free flour blend (Bob’s Red Mill is reliable).
- For dairy-free, use plant-based butter sticks (Earth Balance works well, though flavor is a bit less rich).
- Egg substitute: 1 Tbsp ground flaxseed + 2.5 Tbsp water works in a pinch.
- If you’re low on vanilla, almond extract gives a fun twist (just use half the amount).
- Don’t have black food gel? Mix blue and red gel until you get a deep purple or black hue—it’s not perfect, but works for that spooky vibe.
- For a richer taste, brown sugar can replace half the granulated sugar, though the cookie color will be a bit darker.
All these ingredients come together for cookies that are equal parts showstopper and comfort food. If you want to personalize, toss in mini chocolate chips or add a dash of cinnamon for a warmer note. These Halloween pinwheel cookies are easy to tweak, so have fun and make them your own!
Equipment Needed
- Electric mixer (stand or hand mixer) – Creams the butter and sugar quickly. If you’re mixing by hand, be prepared for an arm workout!
- Mixing bowls – You’ll want at least two: one for the main dough and another for dividing and coloring.
- Plastic wrap or parchment paper – Essential for rolling out and chilling the dough. Parchment helps prevent sticking (trust me, I learned the hard way).
- Rolling pin – For flattening the dough layers. If you don’t have one, a clean wine bottle works surprisingly well.
- Baking sheets – Standard rimmed sheets. If you only have one, just bake in batches.
- Sharp knife or unflavored dental floss – For slicing the pinwheels cleanly. Floss gives the best definition (my grandma’s trick!).
- Wire cooling rack – Helps the cookies cool evenly and prevents soggy bottoms.
If you’re short on specialty tools, don’t stress. I’ve used a glass jar as a rolling pin and cut cookies with a pizza wheel before. For budget-friendly options, check local discount stores or online marketplaces—basic tools are just fine for Halloween pinwheel cookies. Keep parchment on hand, though. It saves the day every time!
Preparation Method
-
Make the Dough:
In a large bowl, cream together the softened butter (1 cup / 226g) and granulated sugar (1 cup / 200g) using an electric mixer for about 2-3 minutes, until light and fluffy. Add the egg and vanilla extract (2 tsp / 10ml), then beat until smooth.
Tip: Scrape down the sides as needed to get everything mixed in. -
Combine Dry Ingredients:
In a separate bowl, whisk together the flour (2 1/2 cups / 310g), baking powder (1 tsp / 4g), and salt (1/2 tsp / 2g). Gradually add the dry mixture to the wet ingredients, mixing on low. The dough will be soft but not sticky.
Warning: Don’t overmix, or your cookies may turn out tough. -
Divide and Color:
Split the dough evenly into two portions. Place each half in its own bowl. Add orange gel food coloring to one and black (or purple) to the other. Knead gently until each color is fully incorporated.
Tip: Gel colors give the brightest hues without thinning the dough. Wear gloves if you’re worried about stained hands! -
Roll Out the Dough:
On a sheet of parchment, roll out each colored dough into a rectangle about 8×12 inches (20x30cm), roughly 1/4 inch (6mm) thick. Try to keep both rectangles the same size for even spirals.
Troubleshooting: If the dough cracks, let it rest for 5 minutes to warm up before rolling. -
Layer and Roll:
Carefully place one colored rectangle on top of the other, using parchment to help lift. Gently press to seal. Starting from the long edge, tightly roll the dough into a log, peeling away the parchment as you go.
Prep Note: Roll slowly for tight swirls. If cracks form, pinch gently to seal. -
Chill:
Wrap the log tightly in plastic wrap and freeze for 40-60 minutes. This firms up the dough for clean slicing.
Tip: Don’t skip this step—warm dough smears and loses those crisp spirals! -
Slice and Bake:
Preheat your oven to 350°F (175°C). Line baking sheets with parchment. Slice the chilled log into 1/4-inch (6mm) rounds using a sharp knife or dental floss. Arrange cookies 2 inches (5cm) apart.
Optional: Roll edges in Halloween sprinkles or sanding sugar for extra sparkle. -
Bake:
Bake for 10-12 minutes, until edges are just set and centers are soft. The colors should stay vibrant—if they start browning, pull them early.
Sensory cue: Cookies should look puffy, not browned, and smell buttery-sweet. -
Cool:
Let cookies cool on the baking sheet for 5 minutes before transferring to a wire rack. They’ll firm up as they cool.
Efficiency tip: Rotate baking sheets halfway through for even baking.
If you want extra-large cookies, roll a thicker log. For mini treats, make two smaller logs and slice thinner rounds. I’ve found that chilling overnight gives the cleanest swirl, but if you’re short on time, 40 minutes in the freezer works just fine. Don’t worry if your first few slices look a bit wonky—practice makes perfect, and honestly, the imperfect ones taste just as good!
Cooking Tips & Techniques
Over the years, I’ve picked up a handful of tricks to make Halloween pinwheel cookies foolproof and fabulous. Here’s what I wish I’d known from the start:
- Color Intensity: Use gel food coloring—not liquid. Liquid dyes can make the dough sticky and pale. Gel keeps the dough firm and the colors vibrant.
- Chilling Time: Don’t rush the chill. A solid hour in the freezer gives you razor-sharp swirls. If you slice too soon, the colors blur and the cookies flatten out.
- Rolling Technique: Roll from the long edge for more spirals. Keep the dough rectangles even in thickness. If they’re lopsided, the swirl will be uneven (I learned this after a few monster-shaped cookies!).
- Cutting Method: Dental floss is your best friend. Slide it under the log, cross the ends, and pull tight. It makes perfect slices without squishing.
- Sugar Sprinkle Hack: If you want glittery edges, roll the log in colored sugar before slicing. It sticks best if the dough is slightly softened, not rock-hard.
- Batch Baking: Bake cookies one sheet at a time for even heat. If your oven has hot spots, rotate the tray halfway through.
- Common Mistake—Overbaking: These cookies look pale when done. Overbaking leads to dry, crumbly texture. Pull them when the edges are just set.
Honestly, my first batch was a little bit of a mess—colors bled, swirls were wonky, and I forgot to chill the dough. Still tasted great, but they didn’t win any beauty contests. With practice, I found my groove. Now, every batch is party-ready! If you’re multitasking, prep the dough ahead and keep it chilled until right before baking. That way, you can slice and bake while you wrangle costumes or set out punch bowls. For consistency, measure your rectangles and roll tightly. It really makes a difference!
Variations & Adaptations
Halloween pinwheel cookies are a blank canvas for creativity. Here are some of my favorite twists and swaps:
- Gluten-Free: Swap the all-purpose flour with a 1:1 gluten-free blend. The texture is slightly more crumbly, but the flavor holds up (Bob’s Red Mill is my go-to).
- Vegan: Use plant-based butter and a flaxseed egg (1 Tbsp ground flax + 2.5 Tbsp water, mixed and rested for 5 minutes). No one will know the difference!
- Flavor Boost: Add 1/2 tsp cinnamon or pumpkin pie spice to the dough for a warm, autumnal twist. For citrus lovers, a little orange zest brightens up the orange swirl.
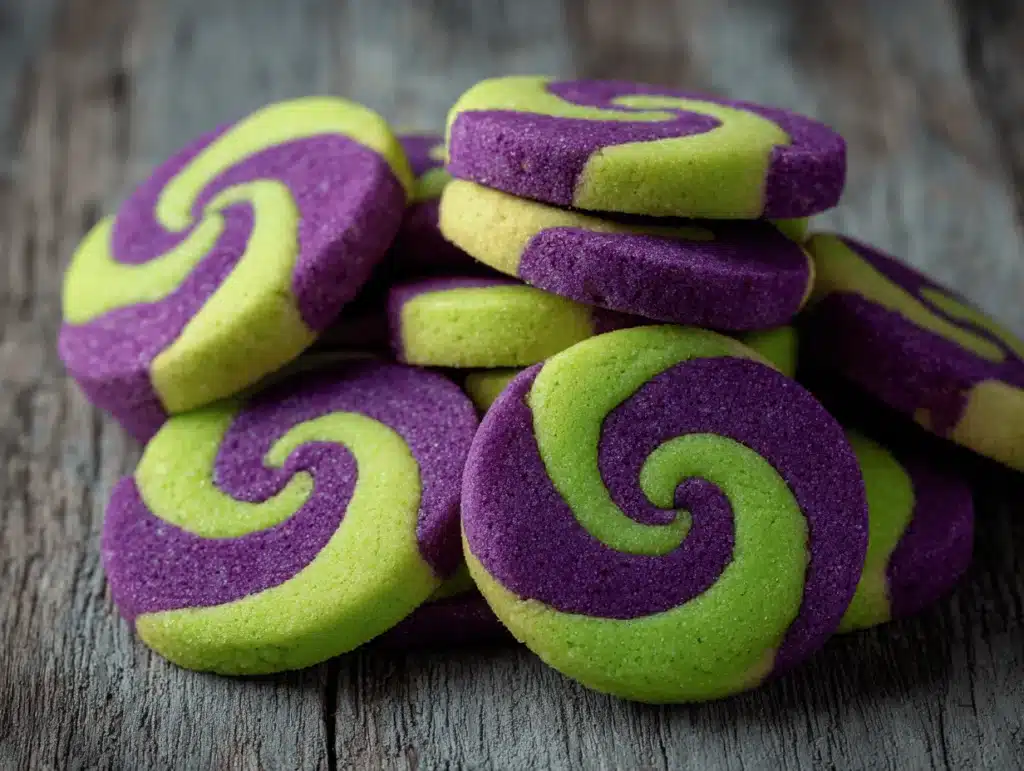
- Color Play: Try purple and neon green swirls for a witchy vibe, or black and white for a ghostly look.
- Sprinkle Surprise: Mix Halloween sprinkles right into the dough before rolling for confetti-style pinwheels.
- Chocolate Pinwheels: Replace 1/4 cup (30g) flour in the black layer with cocoa powder for a deep chocolate flavor and color.
For different baking methods, you can slice the chilled dough thicker for soft-baked cookies or thinner for crispier edges. I’ve made a batch with almond extract instead of vanilla—so good, especially for adults. If you’re avoiding common allergens, sunflower seed butter can replace some of the fat, though the texture is a bit more crumbly. My personal favorite? Orange zest in the orange swirl and dark chocolate chips in the black swirl. It’s a treat that feels just a little bit fancy and very Halloween!
Serving & Storage Suggestions
Halloween pinwheel cookies shine when served fresh and beautifully displayed. Here’s how I make them the centerpiece of spooky parties:
- Serving Temperature: Best enjoyed at room temperature. The texture is soft with a slight chew, and the colors pop.
- Presentation: Arrange cookies on a black platter or tiered tray for dramatic effect. Add fake spiders or candy eyeballs for extra Halloween flair.
- Pairings: Serve with hot cocoa, cider, or a big bowl of “witch’s brew” punch. These cookies also pair well with fruit platters or salty snacks (like popcorn balls).
- Storage: Keep cookies in an airtight container at room temperature for up to 5 days. Separate layers with parchment to prevent sticking.
- Freezing: Pinwheel dough logs freeze beautifully for up to 3 months. Slice and bake straight from the freezer, adding a minute or two to baking time.
- Reheating: If cookies start to dry out, a quick 5-second zap in the microwave brings back their softness.
- Flavor Development: The vanilla flavor deepens after a day; colors stay bold as long as you keep them out of direct sunlight.
If you’re prepping for a party, bake a batch the night before and store in a covered container. They’re still perfect the next day, and honestly, the flavors are even better after they rest!
Nutritional Information & Benefits
Here’s a quick look at what’s inside each Halloween pinwheel cookie (approximate values per cookie):
- Calories: 90
- Fat: 4g
- Carbs: 12g
- Protein: 1g
- Sugar: 6g
While these cookies are definitely a treat, there are some health perks. Butter provides a bit of vitamin A, and the flour supplies energy. Using plant-based or gluten-free swaps makes them friendly for more diets. Watch out for allergens: contains wheat, egg, and dairy (unless you use substitutions). For my family, having a festive, homemade cookie we can adapt for dietary needs feels good—and honestly, it’s way better than store-bought treats loaded with preservatives. Enjoy in moderation, and savor the fun!
Conclusion
If you’re hunting for the ultimate spooky party treat, Halloween pinwheel cookies are your answer. They deliver big on color, flavor, and fun, but won’t eat up your whole weekend. I love how customizable they are—change the colors, add sprinkles, swap flavors. Whether you’re a beginner or a seasoned baker, this recipe is a must-try for October. Every batch I make becomes a crowd favorite, and I bet yours will too!
So why not whip up a tray for your next Halloween gathering? Share your twists, tag me with your creations, and let’s make this season the sweetest yet. Drop a comment below with your favorite variation or party story—I’d love to hear how your Halloween pinwheel cookies turned out. Happy baking, and have a spooky good time!
FAQs
How do I keep the colors from bleeding in my Halloween pinwheel cookies?
Use gel food coloring and chill the dough well before slicing. This keeps the colors sharp and prevents bleeding during baking.
Can I make these cookies ahead of time for a party?
Absolutely! You can make the dough log a few days ahead and slice/bake the day of. Baked cookies stay fresh for up to 5 days in an airtight container.
What if I don’t have orange or black gel food coloring?
You can mix red and yellow for orange, and combine blue and red for a deep purple or blackish hue. Experiment until you get the shade you want!
Are these Halloween pinwheel cookies suitable for gluten-free diets?
Yes! Just swap the all-purpose flour for a 1:1 gluten-free blend. The texture is a bit different, but the cookies are still delicious.
How do I get perfect, even swirls?
Roll both dough layers evenly and tightly. Chill the log well before slicing, and use dental floss or a sharp knife for clean cuts.
Pin This Recipe!
Halloween Pinwheel Cookies: Easy Spooky Treats for Parties
- Total Time: 1 hour 30 minutes
- Yield: 36 cookies 1x
Description
These vibrant Halloween pinwheel cookies feature hypnotic orange and black swirls, a classic sugar cookie flavor, and a soft, chewy texture. Perfect for parties, they’re easy to make, customizable, and guaranteed to be a crowd-pleaser for both kids and adults.
Ingredients
- 2 1/2 cups all-purpose flour (310g)
- 1 cup unsalted butter, softened (226g)
- 1 cup granulated sugar (200g)
- 1 large egg, room temperature
- 2 teaspoons pure vanilla extract (10ml)
- 1 teaspoon baking powder (4g)
- 1/2 teaspoon fine sea salt (2g)
- Orange gel food coloring
- Black gel food coloring (or purple gel for a twist)
- Optional: Halloween sprinkles or sanding sugar for edges
Instructions
- In a large bowl, cream together the softened butter and granulated sugar using an electric mixer for about 2-3 minutes, until light and fluffy. Add the egg and vanilla extract, then beat until smooth.
- In a separate bowl, whisk together the flour, baking powder, and salt. Gradually add the dry mixture to the wet ingredients, mixing on low until a soft dough forms.
- Divide the dough evenly into two portions. Place each half in its own bowl. Add orange gel food coloring to one and black (or purple) to the other. Knead gently until each color is fully incorporated.
- On a sheet of parchment, roll out each colored dough into a rectangle about 8×12 inches, roughly 1/4 inch thick. Keep both rectangles the same size.
- Carefully place one colored rectangle on top of the other, using parchment to help lift. Gently press to seal. Starting from the long edge, tightly roll the dough into a log, peeling away the parchment as you go.
- Wrap the log tightly in plastic wrap and freeze for 40-60 minutes to firm up the dough for clean slicing.
- Preheat oven to 350°F (175°C). Line baking sheets with parchment. Slice the chilled log into 1/4-inch rounds using a sharp knife or dental floss. Arrange cookies 2 inches apart. Optional: Roll edges in Halloween sprinkles or sanding sugar.
- Bake for 10-12 minutes, until edges are just set and centers are soft. Colors should stay vibrant.
- Let cookies cool on the baking sheet for 5 minutes before transferring to a wire rack to cool completely.
Notes
For best color, use gel food coloring and chill the dough log thoroughly before slicing. Dental floss makes clean cuts for sharp swirls. You can swap flour for a gluten-free blend or use plant-based butter and a flaxseed egg for vegan adaptation. Roll the log in colored sugar for glittery edges. Store cookies in an airtight container for up to 5 days or freeze dough logs for up to 3 months.
- Prep Time: 30 minutes
- Cook Time: 12 minutes
- Category: Dessert
- Cuisine: American
Nutrition
- Serving Size: 1 cookie
- Calories: 90
- Sugar: 6
- Sodium: 40
- Fat: 4
- Saturated Fat: 2.5
- Carbohydrates: 12
- Fiber: 0.3
- Protein: 1
Keywords: Halloween cookies, pinwheel cookies, sugar cookies, party treats, spooky desserts, easy Halloween recipe, kid-friendly cookies, festive cookies