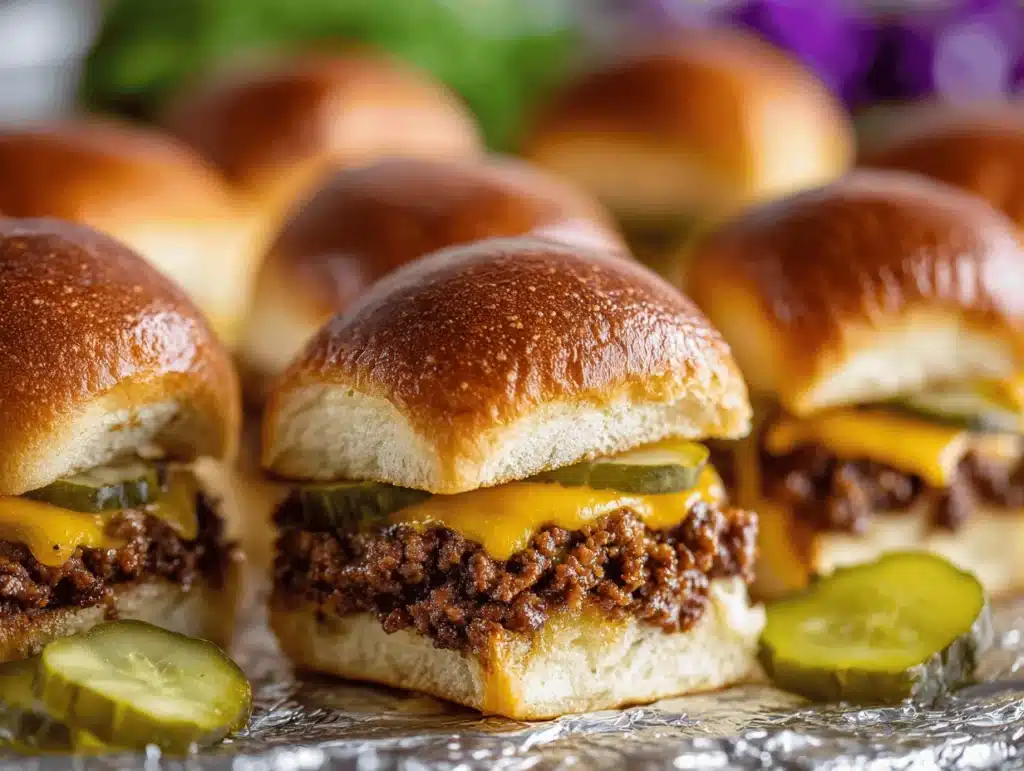
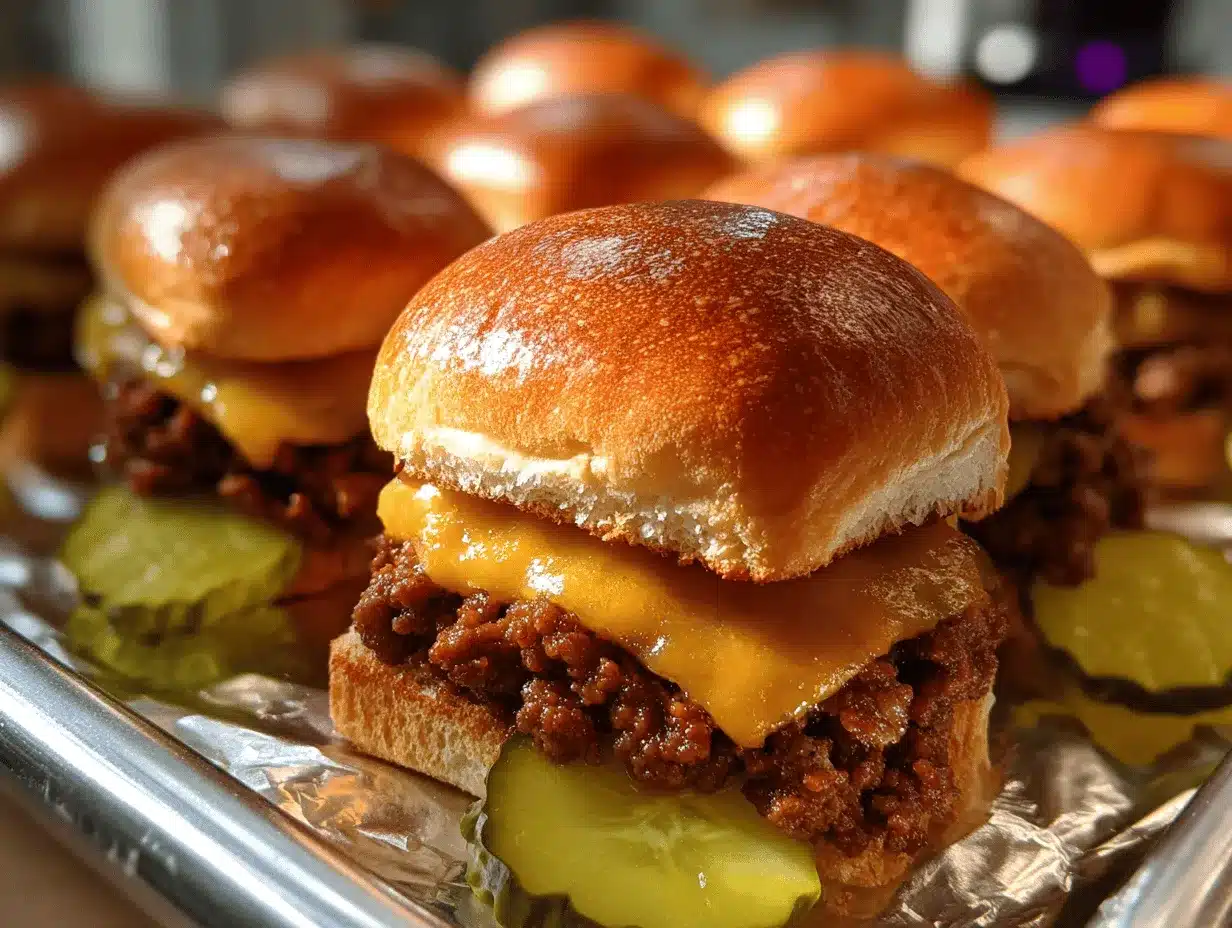
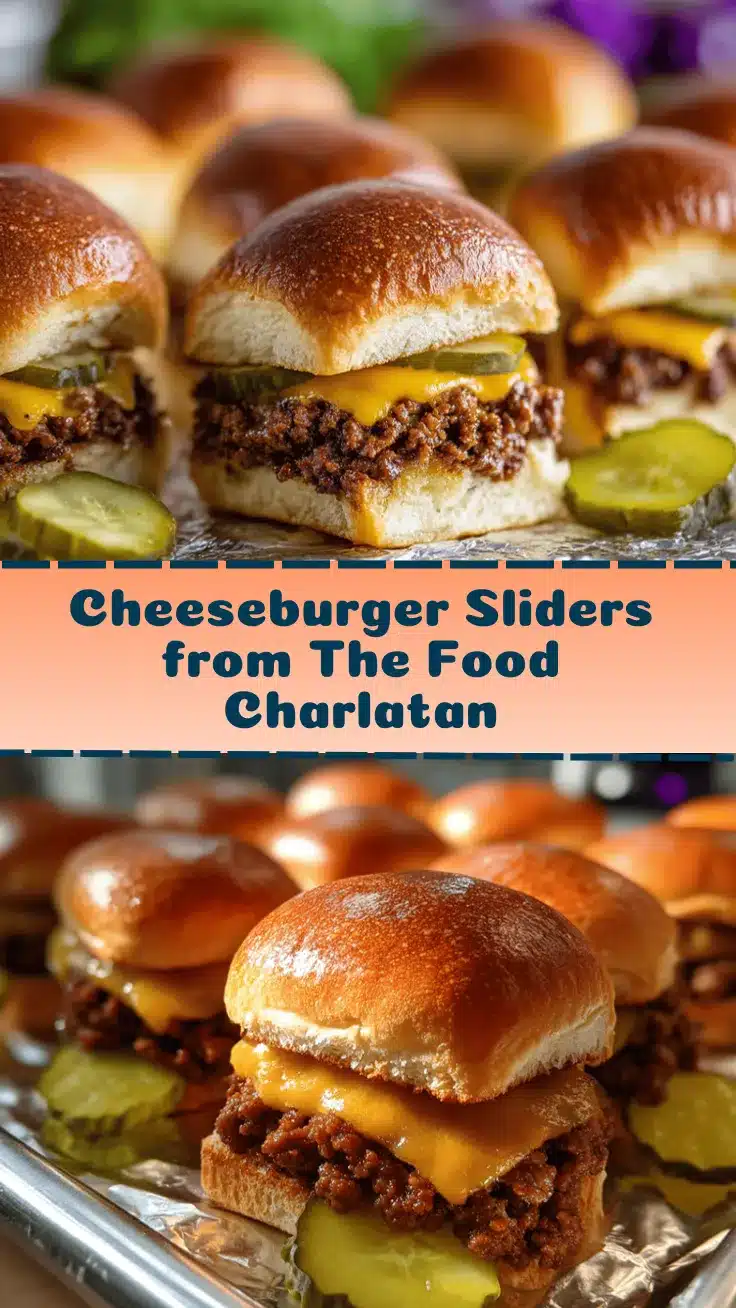
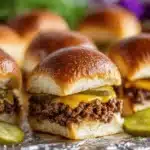
Hot, melty, cheesy sliders straight from the oven—that’s what I crave on a weeknight when life feels too busy for anything fancy. You know that feeling when you catch a whiff of sizzling beef and toasted buns and suddenly, everything else melts away? That’s the magic of these Quick Cheeseburger Sliders. I first started making them when my kids begged for “real burgers” but I didn’t want to stand outside at the grill (especially in the middle of a rainstorm!). The oven method is a total lifesaver—no flipping, no splatter, just pure cheeseburger goodness packed into cute, shareable little sandwiches.
This recipe isn’t just a shortcut; it’s a full-on flavor bomb. The trick is baking the beef and cheese right on the rolls, so every bite is juicy and gooey. I’ve tweaked this method so many times, and honestly, it’s foolproof now. Even my picky eaters devour them—sometimes before I’ve even set the tray down. If you’re looking for a dinner that’s lightning-fast, crowd-pleasing, and tastes like a party, these oven cheeseburger sliders are your ticket. Perfect for busy families, game nights, potlucks, or just anyone who loves classic comfort food made easy.
As someone who’s tested dozens of slider recipes, I can say these are my go-to for a reason. They deliver every time—crispy on the outside, tender on the inside, with all that savory cheeseburger flavor you crave. Whether you’re a weeknight warrior or just want something delicious in 30 minutes, these Quick Cheeseburger Sliders will hit the spot. Let’s get cooking!
Why You’ll Love This Recipe
Honestly, there are so many reasons these Quick Cheeseburger Sliders are a must-try. I’ve made them for birthday parties, weekday lunches, and even for a midnight snack (not judging if you do the same!). After baking them more times than I can count, here’s why they always get rave reviews:
- Lightning-Fast Dinner: Ready in just 30 minutes—no need to fire up the grill or wait for takeout.
- Minimal Cleanup: Everything cooks in one baking dish, so you aren’t stuck scrubbing pans after dinner.
- Packed with Flavor: You get classic cheeseburger taste with juicy beef, gooey cheese, and buttery toasted buns all in every bite.
- Perfect for Sharing: These sliders are sized just right for parties, family dinners, or game day snacking.
- Kid-Approved: Even the pickiest eaters love them—my children have never turned one down (and that’s saying something!).
- Customizable: Add your favorite toppings—pickles, onions, bacon, or whatever you love most.
- Easy Ingredients: No fancy grocery list required; just grab a pack of dinner rolls, ground beef, cheese, and your favorite condiments.
What sets this recipe apart from the usual slider is the oven-baked method. You don’t have to fuss with forming individual patties or flipping anything. I blend seasonings right into the beef and bake it as one layer—so every slider is equally juicy and flavorful. The cheese melts perfectly, the buns get golden, and the whole thing comes together in a way that feels special but is secretly effortless.
There’s something comforting about pulling a tray of hot cheeseburger sliders from the oven—especially when you know dinner’s done, everyone’s happy, and cleanup is a breeze. It’s the kind of meal that brings people together. These Quick Cheeseburger Sliders aren’t just another recipe; they’re my go-to for turning an ordinary night into a little celebration. Try them once, and I bet you’ll see why!
Ingredients Needed
This Quick Cheeseburger Sliders recipe relies on classic, pantry-friendly ingredients to deliver maximum flavor with minimal effort. I love that you can tweak things based on what’s in your fridge—so don’t be afraid to swap or add your favorites!
- For the Beef Layer:
- 1 pound (450g) ground beef (80/20 works best for juiciness)
- 1 teaspoon kosher salt
- 1/2 teaspoon ground black pepper
- 1 teaspoon garlic powder (adds that savory kick)
- 1 teaspoon onion powder (for classic burger flavor)
- Optional: 1 tablespoon ketchup or mustard (mix into the beef for extra tang—my kids love this)
- For the Sliders:
- 1 package (12-count) dinner rolls or slider buns (Hawaiian rolls are a favorite in my house—soft and slightly sweet)
- 8 slices cheddar cheese (about 150g; you can use American, Swiss, or pepper jack for a twist)
- 2 tablespoons unsalted butter, melted (for brushing tops)
- Optional: 1 tablespoon sesame seeds (for a “real burger” look—my kids think this is fun!)
- For the Toppings:
- Dill pickle slices
- Thinly sliced onions
- Ketchup, mustard, mayonnaise (classic burger condiments)
- Lettuce or tomato, if you want to add some freshness
Ingredient Tips: For best texture, I go with ground beef that’s not too lean—a little fat keeps the sliders juicy. If you want a lighter option, ground turkey or chicken works. For gluten-free, swap the rolls with your favorite GF buns (Udi’s is a solid choice). If you’re dairy-free, use vegan cheese slices and skip the butter or sub with olive oil.
I’ve tried this with all sorts of cheeses—cheddar is classic, but American melts like a dream. For a smoky flavor, try smoked gouda! Don’t be afraid to play around. Trust me, these sliders are super forgiving.
Equipment Needed
You don’t need fancy gadgets for these Quick Cheeseburger Sliders—just reliable basics that get the job done. Here’s what I use, plus some alternatives if you’re working with a minimalist kitchen:
- 9×13-inch (23x33cm) baking dish: Glass or ceramic both work. If you only have a sheet pan, just line it with parchment and keep an eye on the edges so they don’t over-brown.
- Large mixing bowl: For seasoning and mixing the ground beef.
- Spatula or spoon: For spreading the beef evenly across the rolls.
- Sharp knife: To slice the rolls in half horizontally (if using a connected pack like Hawaiian rolls).
- Pastry brush (optional): For brushing melted butter on top. If you don’t have one, a spoon or even clean fingers work in a pinch.
- Aluminum foil: To cover the sliders during baking and keep them moist.
If you’re making sliders often, investing in a quality baking dish is smart. I’ve used Pyrex dishes for years (they last forever). For easy cleanup, you can line your dish with parchment paper—less scrubbing, more relaxing. And if you don’t have a pastry brush, don’t sweat it! Melted butter can be drizzled and spread with the back of a spoon.
Preparation Method
- Prep the Oven and Rolls: Preheat your oven to 350°F (175°C). Take your 12-count dinner rolls and slice them horizontally (like opening a book), keeping the rolls connected. Set the tops aside and place the bottom halves in your baking dish.
- Season and Cook the Beef: In a large bowl, mix 1 pound (450g) ground beef with 1 teaspoon salt, 1/2 teaspoon pepper, 1 teaspoon garlic powder, and 1 teaspoon onion powder. If using ketchup or mustard, mix it in now. Heat a skillet over medium-high and cook the beef, breaking it up as it browns, until no pink remains (about 5-7 minutes). Drain excess fat if needed.
- Layer the Beef: Evenly spread the cooked beef mixture over the bottom halves of the rolls. Aim for an even layer so every slider gets plenty of filling.
- Add Cheese: Layer 8 cheese slices over the beef, overlapping slightly so every roll is covered. You want that perfect melt!
- Add Toppings (Optional): If you’re using onions or pickles, scatter them on top of the cheese. I love adding a few pickle slices to half for variety—some family members skip them, so I always do a “half and half.”
- Finish and Bake: Place the tops of the rolls back on. Brush with 2 tablespoons melted butter and sprinkle with sesame seeds if using. Cover tightly with foil (this keeps everything super soft and gooey).
- Bake: Bake covered for 15 minutes. Remove foil and bake another 5-7 minutes, until the tops are golden brown and cheese is fully melted. You’ll know they’re ready when you see cheese bubbling out the sides and the tops are slightly crisp.
- Slice and Serve: Use a sharp knife to slice along the edges of each roll. Serve hot with ketchup, mustard, and mayo for dipping. If you’re feeling fancy, add some lettuce or tomato on the side.
Notes: If your rolls start to brown too much, cover loosely with foil. For a crispier bottom, bake uncovered for the last 2 minutes. If the beef seems dry, add a tablespoon of water or ketchup when mixing. You’ll smell that classic burger aroma—when the tops are golden and the cheese is oozy, they’re good to go!
Cooking Tips & Techniques
Here’s the part where experience really counts! I’ve made a lot of sliders over the years, and these little tricks make all the difference:
- Even Layering: Spread the beef mixture evenly over the rolls—don’t leave any corners empty. I’ve rushed this step before and ended up with some dry sliders and some overloaded ones. Take your time (it’s worth it).
- Butter Brushing: Don’t skip the melted butter on top. It adds flavor and helps the buns get that irresistible golden crunch.
- Cover While Baking: Keeping the sliders covered with foil for most of the bake locks in moisture and melts the cheese perfectly. Only uncover for the last few minutes for crispy tops.
- Choose Your Beef Wisely: I used extra-lean beef once and the sliders were a bit dry. Stick to 80/20 or add a splash of ketchup for juiciness.
- Add Pickles After Baking: If you want super crisp pickles, add them after baking instead of before. That way they don’t go limp.
- Multitasking: While the beef cooks, prep your rolls and slice the cheese. That way everything’s ready to layer up when the beef is done.
- Don’t Overbake: Watch closely once you remove the foil; the tops brown fast. From experience, an extra 2 minutes can mean the difference between perfect and dry.
My worst slider mistake? Forgetting to drain the beef and ending up with soggy bottoms. So, always drain any excess fat! If you want extra flavor, sprinkle a pinch of garlic salt on the tops before baking. These little details really make your Quick Cheeseburger Sliders stand out, trust me.
Variations & Adaptations
One of the best things about Quick Cheeseburger Sliders is how easy they are to customize. Whether you’re working around dietary needs or just looking to switch up the flavor, here are my favorite ways to adapt:
- Low-Carb or Keto: Swap the dinner rolls for mini lettuce cups or low-carb buns. I’ve done this for friends on keto—still delicious, just a little lighter.
- Vegetarian: Use a plant-based ground beef (like Impossible or Beyond Meat) and vegan cheese. I tried this at a neighborhood potluck and nobody even realized it was meatless!
- Seasonal Flavors: In summer, add grilled onions or roasted peppers for a smoky kick. Around the holidays, I toss in a little cranberry sauce with the beef—sounds weird, but it’s a fun twist!
- Spicy Version: Mix diced jalapeños into the beef or use pepper jack cheese. My partner loves a little heat, so I always make a “spicy half” for him.
- Allergen-Friendly: For gluten-free, use GF rolls; for dairy-free, swap cheese and butter for plant-based alternatives.
My personal favorite? Adding a layer of crispy bacon between the beef and cheese. It’s a little extra work but totally worth it on special occasions. Don’t be afraid to play around—these sliders are a blank canvas for whatever sounds good!
Serving & Storage Suggestions
These Quick Cheeseburger Sliders are best served piping hot, straight from the oven. I like to slice them and pile them onto a platter, then add a few bowls of ketchup, mustard, and mayo for dipping. They look great with a sprinkle of fresh parsley or chives, too.
If you’re serving for a party, pair them with oven fries, potato chips, or a simple slaw. For drinks, classic root beer or lemonade is always a hit. They’re also perfect with a cold beer if you’re hosting game night!
Storage Tips: Leftover sliders keep well in the fridge for up to 3 days. Store them in an airtight container. To reheat, wrap them in foil and bake at 350°F (175°C) for 10 minutes, or microwave for 30 seconds each. If freezing, wrap tightly in foil and freeze for up to 2 months. Thaw overnight, then warm in the oven.
Honestly, the flavors get even better the next day—the beef and cheese meld together, and the buns soak up all those savory juices. Perfect for grab-and-go lunches!
Nutritional Information & Benefits
Here’s what you can expect per slider (based on 12 sliders):
- Calories: ~220
- Protein: ~12g
- Fat: ~12g
- Carbs: ~16g
The main health win here is protein—between the beef and cheese, these sliders are filling and satisfying. If you use lean beef or swap in turkey, you’ll cut down the fat. For gluten-free, just switch to GF rolls. Watch out for cheese and buns if you’re avoiding dairy or gluten.
I love using real, simple ingredients—no mystery meat, just classic flavors. For me, these sliders are comfort food that fits into a balanced dinner, especially with a side salad. They’re perfect if you want a meal that’s hearty but not heavy.
Conclusion
There’s a reason Quick Cheeseburger Sliders are a staple in my kitchen—they’re fast, fun, and totally delicious. If you’re craving something easy but still crave-worthy, this recipe delivers. Plus, it’s endlessly customizable, so you can make it your own every time.
I love how these sliders bring everyone to the table (and keep them coming back for seconds). Whether you’re feeding a crowd or sneaking a midnight snack, they always hit the spot. Give them a try, and let me know how you make them your own!
If you whip up these Quick Cheeseburger Sliders, drop a comment below—share your favorite toppings or any fun twists you’ve tried. Don’t forget to pin this recipe for later and share it with friends who need a quick dinner fix. Happy cooking!
FAQs
Can I prep these Quick Cheeseburger Sliders ahead of time?
Absolutely! Assemble everything except the butter topping, cover, and refrigerate up to 24 hours. Just brush with butter and bake when you’re ready.
What’s the best cheese for oven sliders?
Cheddar and American are classics—they melt beautifully. Swiss or pepper jack adds a fun twist if you want to change it up.
Can I freeze cheeseburger sliders?
Yes, wrap tightly in foil and freeze for up to 2 months. Thaw overnight and reheat in the oven for best texture.
How do I make these gluten-free?
Use your favorite gluten-free rolls or buns. Everything else stays the same!
Do I have to use ground beef for this recipe?
Nope! Ground turkey, chicken, or a plant-based meat substitute works just fine. Just adjust seasonings to taste.
Pin This Recipe!
Quick Cheeseburger Sliders
- Total Time: 30 minutes
- Yield: 12 sliders 1x
Description
These oven-baked cheeseburger sliders are juicy, cheesy, and ready in just 30 minutes—perfect for busy weeknights, parties, or game day. No grilling required, minimal cleanup, and totally customizable for your favorite toppings.
Ingredients
- 1 pound ground beef (80/20 recommended)
- 1 teaspoon kosher salt
- 1/2 teaspoon ground black pepper
- 1 teaspoon garlic powder
- 1 teaspoon onion powder
- 1 tablespoon ketchup or mustard (optional)
- 1 package (12-count) dinner rolls or slider buns (e.g., Hawaiian rolls)
- 8 slices cheddar cheese (about 5 oz)
- 2 tablespoons unsalted butter, melted
- 1 tablespoon sesame seeds (optional)
- Dill pickle slices (optional)
- Thinly sliced onions (optional)
- Ketchup, mustard, mayonnaise (for serving)
- Lettuce or tomato (optional, for serving)
Instructions
- Preheat oven to 350°F (175°C). Slice the 12-count dinner rolls horizontally, keeping the rolls connected. Place the bottom halves in a 9×13-inch baking dish.
- In a large bowl, mix ground beef with salt, pepper, garlic powder, onion powder, and optional ketchup or mustard. Cook in a skillet over medium-high heat, breaking up the meat, until browned and no pink remains (about 5-7 minutes). Drain excess fat.
- Spread the cooked beef evenly over the bottom halves of the rolls in the baking dish.
- Layer cheese slices over the beef, overlapping slightly to cover all rolls.
- Add optional toppings (onions, pickles) over the cheese as desired.
- Place the tops of the rolls back on. Brush with melted butter and sprinkle with sesame seeds if using. Cover tightly with foil.
- Bake covered for 15 minutes. Remove foil and bake another 5-7 minutes, until tops are golden brown and cheese is melted.
- Slice into individual sliders and serve hot with ketchup, mustard, mayo, and optional lettuce or tomato.
Notes
For best results, use 80/20 ground beef for juiciness. Drain excess fat to avoid soggy bottoms. Cover sliders while baking to keep them moist, then uncover for crispy tops. Customize with your favorite cheese, toppings, or use plant-based meat for vegetarian sliders. For gluten-free, use GF rolls; for dairy-free, use vegan cheese and butter alternatives.
- Prep Time: 10 minutes
- Cook Time: 20 minutes
- Category: Main Course
- Cuisine: American
Nutrition
- Serving Size: 1 slider
- Calories: 220
- Sugar: 3
- Sodium: 350
- Fat: 12
- Saturated Fat: 6
- Carbohydrates: 16
- Fiber: 1
- Protein: 12
Keywords: cheeseburger sliders, oven sliders, easy dinner, party food, kid-friendly, weeknight meal, comfort food, ground beef sliders, game day, quick recipe